Your yard should work with you, not against you. When water pools around your foundation after every rainstorm, or when your lawn develops unsightly dips and hills, regrading becomes more than just a landscaping project—it becomes a necessary investment in your property’s health and value.
Yard regrading involves reshaping your landscape’s contours to create proper drainage patterns and eliminate problematic slopes. This process can solve persistent water issues, protect your home’s foundation, and create a more functional outdoor space for your family to enjoy.
Understanding when and how to regrade your yard helps you make informed decisions about this significant landscaping undertaking. Whether you tackle the project yourself or hire professionals, knowing the fundamentals will save you time, money, and potential headaches down the road.
Common Reasons for Regrading Your Yard
Poor Drainage
Poor drainage tops the list of reasons homeowners consider regrading. When water consistently pools in certain areas of your yard or flows toward your house instead of away from it, you’re looking at more than just muddy shoes and soggy grass. Standing water creates breeding grounds for mosquitoes, kills grass and plants, and can lead to serious foundation problems.
Foundation Issues
Foundation issues often develop gradually as improper grading directs water toward your home’s base. Over time, this water infiltration can cause cracks, settling, and even basement flooding. The cost of foundation repairs far exceeds the investment in proper yard grading, making prevention the smart financial choice.
Erosion Problems
Erosion problems signal another clear need for regrading. Steep slopes can wash away topsoil, damage plantings, and create unsightly gullies across your landscape. Uneven terrain also makes lawn maintenance difficult and creates safety hazards for children playing in the yard.
New Landscaping Features
Some homeowners discover grading issues when they plan new landscaping features. Installing patios, decks, or gardens often requires level ground and proper drainage to prevent future problems.

DIY Versus Professional Regrading
Small-scale grading projects often fall within the DIY realm for handy homeowners. Simple slope adjustments, minor drainage improvements, and cosmetic leveling can happen with basic tools and some weekend effort. DIY regrading costs significantly less than professional services since you’re only paying for materials and equipment rental.
However, DIY projects require physical stamina, basic landscaping knowledge, and access to proper equipment. Moving large amounts of soil demands considerable time and effort, and mistakes can create bigger problems than you started with.
Professional regrading makes sense for complex drainage issues, large properties, or situations involving utilities and structures. Experienced contractors bring specialized equipment, technical expertise, and insurance protection to the job. A qualified residential landscaping contractor can assess your specific situation, obtain necessary permits, and complete the work efficiently.
Professionals also understand local building codes, drainage requirements, and soil conditions that affect project success. They can identify potential complications before they become expensive problems.
Steps for DIY Yard Regrading
Planning comes first in any successful regrading project. Walk your property during and after rainfall to identify problem areas and observe natural water flow patterns. Make sure to mark places where water pools or flows in unwanted directions.
Call your local utility marking service before digging to identify underground lines. This free service prevents dangerous accidents and expensive repairs to buried utilities.
Gather necessary tools, including a shovel, rake, wheelbarrow, and tamper. Rent a bobcat or small excavator for larger projects. You’ll also need topsoil, sand, or gravel, depending on your specific requirements.
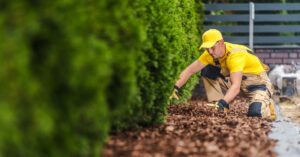
Begin by removing existing grass and plants from work areas. Strip and save healthy sod for replanting if possible. Remove any debris, rocks, or obstacles that might interfere with grading.
Establish your desired grade using stakes and string lines. The general rule calls for a minimum two percent slope away from structures, meaning the ground should drop at least two inches for every ten feet of distance from your house.
Move soil systematically, working from high areas to low spots. Take time to compact soil in thin layers rather than dumping large amounts all at once. Proper compaction prevents settling that can undo your hard work.
Install drainage features like French drains or catch basins if needed. These systems help move excess water away from problem areas and complement your grading efforts.
Rake and smooth the final grade, then replace topsoil and replant grass or other vegetation. Water the newly seeded areas regularly to establish growth that will help prevent erosion.

When Professional Help Makes Sense
Severe drainage problems often require professional intervention. If water consistently flows toward your foundation despite minor grading attempts, or if you notice foundation cracks or basement moisture issues, experienced contractors should evaluate the situation.
Complex landscapes with multiple levels, retaining walls, or extensive hardscaping benefit from professional expertise. These features require careful planning and specialized techniques to integrate properly with new grading.
Large properties or projects requiring significant soil movement make professional services cost-effective. Contractors can complete major regrading projects in days rather than the weeks or months DIY efforts might require.
Permit requirements in your area might necessitate professional involvement. Many municipalities require permits for significant grading changes, and contractors familiar with local regulations can navigate this process smoothly.
Properties with existing drainage systems, underground utilities, or proximity to neighboring structures need professional assessment. Experienced contractors can work around these complications without creating new problems.
Understanding Regrading Costs
DIY regrading costs vary widely based on project scope and equipment needs. Small projects might require only a few hundred dollars in materials and tool rental. Larger undertakings can reach a couple of thousand dollars when factoring in soil, equipment rental, and replacement landscaping.
Professional regrading typically costs a couple of thousand dollars for average residential projects. Complex jobs involving extensive drainage systems or difficult terrain can cost upwards of $10,000. However, these costs often prove justified when compared to potential foundation repair expenses.
Several factors influence final costs, including property size, soil conditions, drainage complexity, and local labor rates. Properties requiring imported soil or disposal of excess dirt face additional charges.
Creating Your Perfect Yard
Proper yard regrading creates the foundation for everything else you want to accomplish with your outdoor space. When water flows correctly and your landscape has appropriate slopes, you can focus on the fun aspects of landscaping like planting gardens, installing features, and creating spaces for family activities.
Take time to assess your specific situation honestly. Small drainage issues and minor slope adjustments make excellent DIY projects for motivated homeowners. However, don’t hesitate to consult with professionals when facing complex problems or large-scale changes.
Your yard represents a significant investment in your property’s value and your family’s enjoyment. Whether you choose DIY methods or professional services, addressing grading issues creates lasting benefits that improve both function and beauty in your outdoor living space.
